How one extra shelf in the freezer stops food avalanches and cuts frost build-up
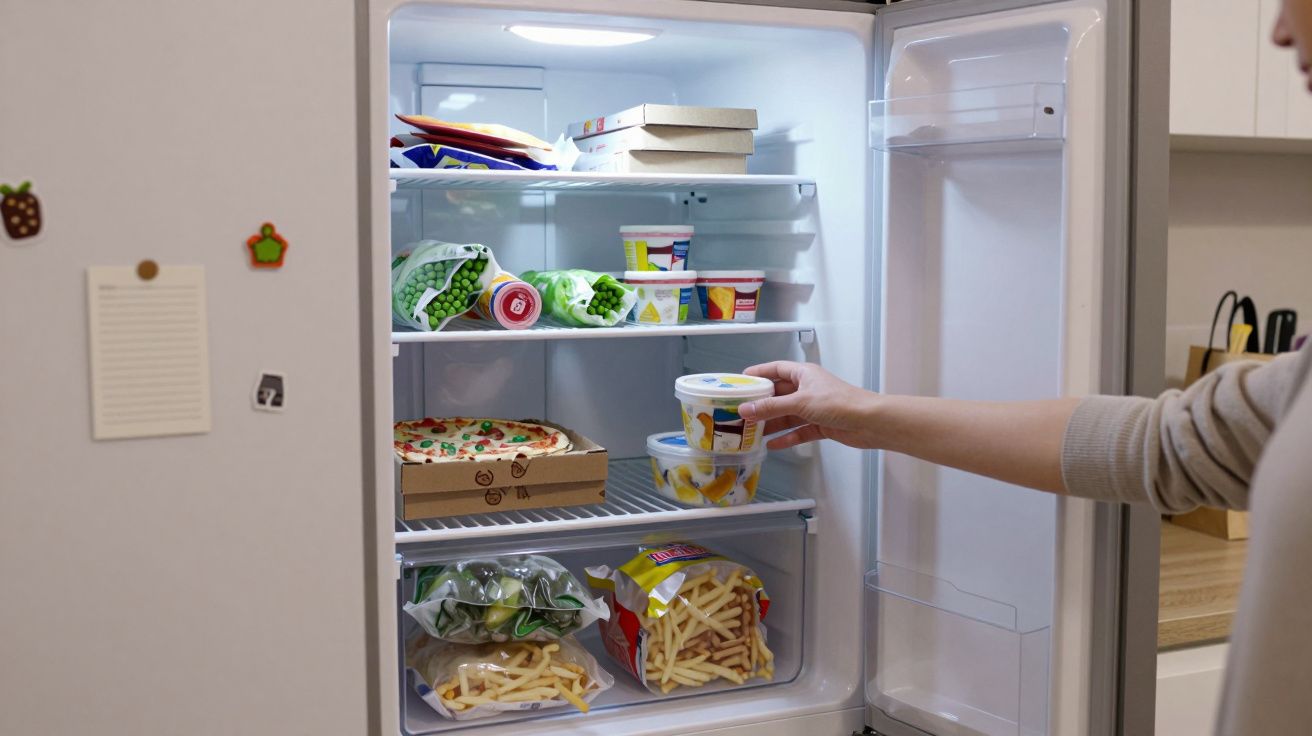
The door swings open and it happens again. A frozen pizza slides forward, a bag of peas launches itself towards your toes, and the ice cream tub you’d forgotten about does a slow, inevitable roll towards the floor. You shove everything back, slam the door and tell yourself you’ll “sort the freezer properly” one day.
Behind that small daily chaos is a simple pattern: tall, empty air and one or two overloaded baskets doing all the work. Food leans, bags collapse into gaps, and cold air swirls around in ways that quietly make frost worse. What looks like a random avalanche is often just a missing layer in the middle.
Add a single, well-placed shelf and the whole thing behaves differently.
The day the avalanche stops in the middle
Picture the inside of a typical upright freezer. At the bottom: a deep drawer so crammed with frozen chips, berries and “mystery leftovers” that you have to dig with your whole arm. Above it: a high shelf with all the light, flat things balanced precariously on top of one another. In between, there’s nothing. Just a big, cold gap.
Every time you open the door, gravity does its quiet work. Soft bags slump downwards, rigid boxes tilt, and anything slightly wedged starts to move. Over a week or two, that movement turns into a leaning tower. Open the door at the wrong angle and half your weekly shop tries to escape.
A friend in a small London flat finally snapped after one too many mid-week avalanches. Instead of “decluttering” or buying clever containers, she did something far more boring. She slid in a simple wire shelf from a homeware shop, the kind that usually lives under a sink. Suddenly, that dead zone in the middle turned into a solid landing.
The next time she opened the door, nothing moved. No cascade, no bruised toes, no box wedged behind the hinge. And after a few weeks, she noticed something else: there was less new frost building up on the top items. The shelf hadn’t just tamed the chaos, it had changed how the cold behaved.
How one shelf changes the way cold air moves
Inside a freezer, cold doesn’t just “sit there”. It sinks, flows and curls around obstacles, a bit like water. When you’ve got big vertical gaps and one or two high mounds of food, you create open channels where warm room air can swoop in every time you open the door, then condense and freeze on the first cold surface it hits.
That’s why the same few boxes often end up with furry ice coats, while others stay relatively clean. They’re standing in the draught.
Add a shelf in the middle and you break that vertical runway. Instead of one big, unstable stack, you’ve got two shorter, flatter layers. The cold air can settle more evenly, and warm air from the kitchen has to work harder to rush across the whole compartment. The result is fewer “shock” frost patches on the front of items and on the underside of the top shelf.
Organisers talk about “using vertical space” as if it’s only about fitting more in. Here, it’s also about smoothing out temperature pockets. When food is spread in thinner layers:
- Each item freezes and refreezes more evenly.
- Fewer things stick together in one icy lump.
- You’re less tempted to wedge hot leftovers into any available gap “just for now”.
The shelf doesn’t add power to the freezer. It makes the power it has behave more predictably.
The small tweaks that make the shelf actually work
Not every extra shelf is helpful. Put the wrong thing in the wrong place and you can choke vents or create a “cold shield” that makes the motor work harder. The trick is to think like the person who designed the freezer, not just like someone desperate for more storage.
Most upright models have a visible cold source: a back panel that frosts first, or an integrated cooling plate. That area needs open space for air to circulate. Your new shelf should sit in front of, not across, that invisible pathway.
A practical rule of thumb:
- Leave a clear strip of space at the very back for air to move.
- Place the new shelf in the middle third of the cavity, not hard up against the top.
- Use a wire or slatted shelf, not a solid tray, so air can still flow through.
Then there’s what goes where. Heavy, brick-like items (meat joints, big containers of batch cooking) belong low, where they can’t slide off onto your feet. Lighter things - tortillas, peas, herbs, ice cream tubs - are perfect for the extra shelf because they sit neatly in a shallow layer instead of teetering on top of everything else.
Soyons honnêtes : nobody wants a labelling system that takes more time than cooking dinner. So aim for “rough zones” rather than perfection:
- Bottom drawer: bulky basics (chips, veg, big bags).
- Middle added shelf: quick-grab dinners and bits you reach for midweek.
- Original top shelf: long-term storage and “back-up” items you don’t need daily.
Within a day or two, your hands will remember what lives where. That’s usually enough to stop you digging like a badger and undoing the order you just created.
Less rummaging, fewer ice crystals, lower bills
The surprising win from that single shelf isn’t just fewer avalanches. It’s how much less time the door spends open. When you can see things clearly in two layers instead of heaped piles, you find the frozen spinach in seconds instead of minutes. The motor gets fewer long, sweaty shocks of warm air and spends less energy dragging the temperature back down.
There’s also a quiet effect on food quality. Every big rummage lets a bit of warm, moist air kiss the surface of your food. When that moisture refreezes, it forms ice crystals and “freezer burn” that makes chips limp and leftovers chalky. A shelf that makes you faster and gentler with the door cuts down on those tiny, repeated insults.
You’ll feel the difference most on overstuffed weeks, when your freezer is carrying Christmas food, batch cooking or guests’ ice cream. That’s when avalanches are most likely, doors stay open longest, and frost builds fastest. With a middle shelf:
- Stacks can’t lean as far before they hit support.
- Light packets don’t get crushed and burst.
- You spot “orphan” items before they fossilise at the back.
It’s not a miracle. It’s just physics plus slightly less human faffing about.
Small moves that turn a chaotic freezer into a calm one
If you don’t want a full weekend “freezer project”, you don’t need one. A calmer, less frosty interior comes from a few five-minute nudges, not a colour-coded overhaul.
Try this simple run-through:
- Take out the top layer only and group similar things together on the worktop.
- Slide in a wire shelf roughly halfway up the cavity, avoiding the back panel.
- Put the most-used items at hand height on the new shelf, in a single, visible layer.
- Put rarely used, flat items up top; heavy bricks go low.
- Leave a hand-width of empty space at the very front so the door can close without shoving piles backwards.
Then stop. Live with it for a week. Notice which spots still cause mini-avalanches or where frost appears first. Tweak that area only.
“We’re not redesigning the freezer,” as one appliance engineer put it. “We’re just giving gravity one more place to rest.”
A freezer that behaves itself doesn’t look like a catalogue photo. It looks slightly boring: two even layers, clear sightlines, and nothing ready to launch itself when you come home with shopping bags and half an idea for dinner.
| Key change | What you do | Why it helps |
|---|---|---|
| Add a middle shelf | Slot in a wire shelf in the centre, away from vents | Breaks tall stacks and slows warm-air rushes |
| Flatten the layers | Keep items in 2–3 shallow layers, not one tall tower | Cuts avalanches and makes everything visible |
| Shorten door time | Put “everyday” food at hand height | Less warm air in, less frost and energy use |
FAQ:
- Won’t an extra shelf block the cold and damage the freezer? Not if you use a wire or slatted shelf and avoid covering the back panel or vents. Leave a gap at the rear and don’t pack items tight against every surface.
- Do I need special freezer-safe shelving? Any metal or plastic shelf designed for kitchen storage that fits securely and can handle low temperatures is fine. Avoid flimsy units that might sag or tip.
- Is this only useful for upright freezers? It works best in upright models and fridge-freezer compartments. Chest freezers benefit more from baskets and crates than from extra shelves.
- Will this actually reduce frost build-up? It can. Shorter door-open times, fewer big air channels and more even stacking all reduce the amount of moist room air that condenses and freezes inside.
- What if my freezer is very small? Even a half-depth shelf at the front can catch falling items and create a second layer. Think of it as a balcony rather than a full extra floor.


Comments (0)
No comments yet. Be the first to comment!
Leave a Comment