The £4 tool decorators keep for fixing tiny wall dents without replastering
It doesn’t look like much. A stubby plastic tube, a blade barely wider than your thumb, usually tossed in the bottom of a tool bag. Yet this cheap little scraper is what many decorators reach for before they even think about opening a tub of filler.
Used properly, it smooths tiny dents, popped paint and faint knocks in a couple of minutes, without the faff of mixing plaster or sanding half the wall. The trick is not the price. It’s knowing what to do with it.
The £4 tool in question – and what it actually does
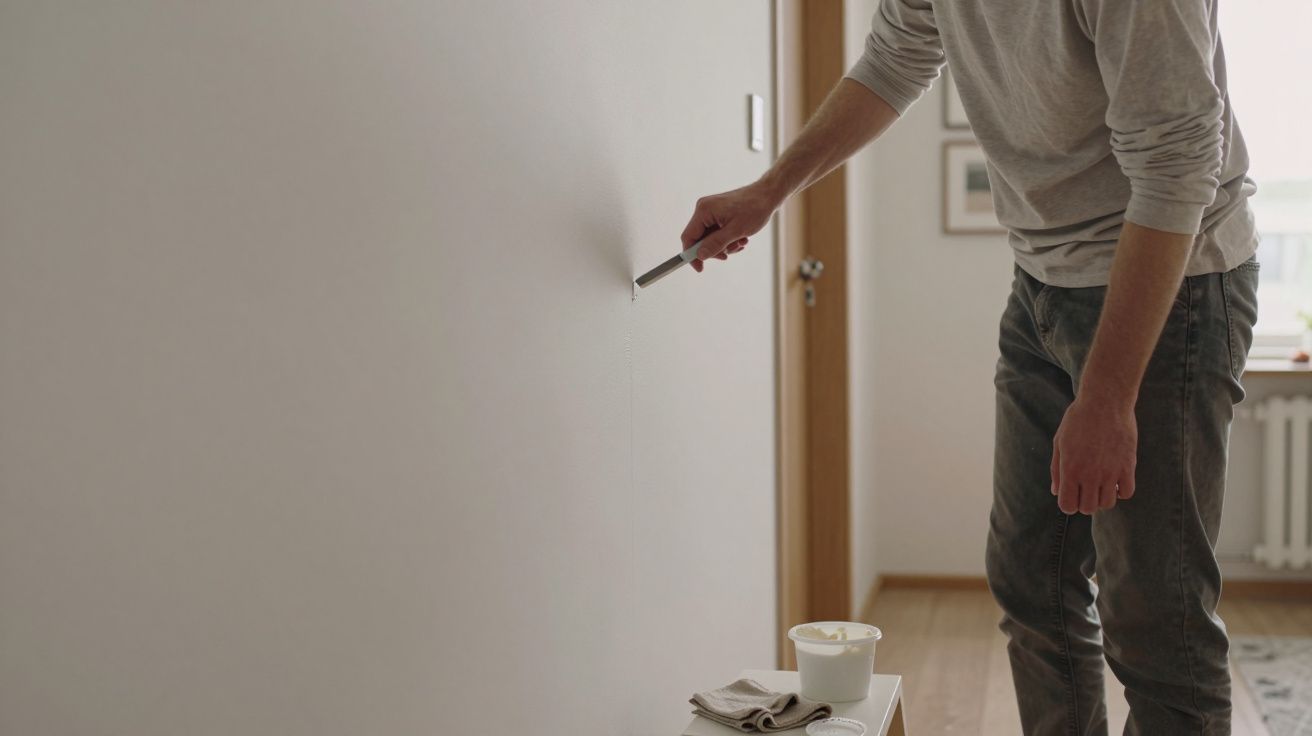
Most professionals keep a small flexible filling knife or plastic spreader specifically for “micro repairs”. It looks like a hybrid between a spatula and a scraper, usually 25–50 mm wide, with just enough flex to follow the curve of a wall.
Instead of loading it with wet plaster, decorators use it with fine surface filler or even existing paint to flatten raised edges and feather tiny defects. On shallow dents, the goal is not to build up a thick patch; it’s to persuade the surrounding paint film to level out so the mark disappears under the next coat.
For dings smaller than a 5p coin, a flexible filling knife cures more problems than a full bag of plaster.
Because the blade is soft-edged and narrow, it can concentrate pressure where it is needed without gouging fresh trenches into the wall. The result is less dust, less sanding and fewer visible “repair islands” once the wall is repainted.
When this trick works – and when it won’t
Not every flaw is a candidate for the filling knife shortcut. The sweet spot is the kind of damage you only see when the light slants sideways across the wall.
Ideal defects for the £4 knife
- Tiny dents from door handles lightly tapping the wall
- Hairline settlement cracks running along paint, not deep into plaster
- Pinhole marks from pins and very small picture hooks
- Slight ridges where old filler was over-applied and never sanded properly
On these, you’re dealing with fractions of a millimetre. You don’t need a skim coat; you need a local flatten and a whisper of fresh material.
Cases where you still need filler or plaster
- Deep gouges where plaster is missing or broken away
- Large blown areas where the paint and plaster sound hollow when tapped
- Cracks that re-open after you press on either side – a sign of movement
- Damp-stained areas where the wall is still soft or crumbly underneath
Once you can see bare brick, exposed backing plaster or feel movement under your fingers, the quick fix is over. That’s a structural or moisture problem, and the sensible move is to repair it properly before any decorative work.
The two-minute repair, step by step
You won’t need a plasterer’s hawk or power sander for this. Just a bit of care and the right sequence.
What you need
- A 25–50 mm flexible filling knife or plastic spreader (around £4)
- Fine ready-mixed surface filler or lightweight interior filler
- A damp microfibre cloth or sponge
- Fine sandpaper (240–320 grit) or a sanding pad
- Optional: a small artist’s brush for spot-priming
The sequence decorators quietly follow
Clean the area.
Wipe away dust, grease and loose flakes with a damp cloth. Let the surface dry. Filler hates contamination; even a smear of old hand cream can make it refuse to bond.Knock back any raised edges.
Hold the knife almost flat and stroke across the dent from several directions. The aim is to flatten high spots around the damage without digging deeper. Think ironing, not scraping.Apply a whisper of filler.
With a tiny amount on the tip of the blade, draw the filler across the dent at 90 degrees to the defect. Then skim back over with almost no pressure, feathering the edges into the surrounding paint. You should barely see a ridge.Wipe and check.
Run a clean finger lightly across. It should feel level, with no sharp shoulders. If there’s too much build-up, remove some with the knife and re-feather.Let it dry and de-nib.
Once the patch is fully dry, use fine sandpaper with a gentle touch. You’re just taking off any specks, not re-shaping the area. Many decorators simply rub with a folded sanding pad in two quick passes.Spot-prime if needed, then paint.
On porous filler or on repaired areas in bathrooms and kitchens, a dab of primer or diluted emulsion helps avoid dull “flashing” marks. Then roll or brush your topcoat, extending slightly beyond the repair.
Count on five minutes of hands-on time and a drying pause, instead of an afternoon of dust and plaster.
Small rules that make a big difference
A £4 knife is forgiving, but it still obeys a few quiet rules. Ignore them and you get visible patches; follow them and the repair vanishes.
Pressure, angle, and patience
Hold the blade at a low angle, almost flat. Too steep, and you’ll carve grooves; too shallow, and you just smear. Let the flex of the tool do half the work. On curved walls or around door frames, work with the curve rather than forcing the surface straight.
Use two or three light passes rather than one aggressive sweep. Professionals rarely “get it in one”. They build up a feel for how the wall responds, adding or removing a trace of material each time.
Light is your best inspector
Raking light – a torch or phone light held close to the wall – reveals more than staring straight on. Before and after filling, tilt your light across the surface. If you still see a hard halo or ridge, the defect will show under paint. If the line has softened and blended, the job is done.
Avoid over-sanding in a bright strip only around the repair. That polished patch can flash through paint as a shiny or dull circle. Instead, fan your sanding strokes out beyond the immediate repair so the transition is invisible.
Tools and fillers that pair well with the knife
You don’t need a shelf full of products, but choosing the right companion for your £4 knife does make the shortcut more reliable.
| Item | Best for | Notes |
|---|---|---|
| Flexible filling knife (25–50 mm) | Small dents, hairline cracks | The go-to; fits into tight spots and corners |
| Lightweight fine filler | Final skin and micro-repairs | Sands easily, shrinks less, ideal under emulsion |
| Ready-mixed tub filler | Casual DIYers and occasional jobs | No mixing, stays usable for months once opened |
For very glossy walls or bathrooms, decorators often favour a filler marked as suitable for “fine finishing” and “low shrinkage”. These are less likely to sink back after drying, which would bring the dent back into view under light.
How often you can use this trick
There isn’t really a hard limit, but there is a common-sense one. If you find yourself correcting the same crack or dent every year, the filling knife has become a sticking plaster rather than a cure.
Use the £4 shortcut to:
- Tidy walls before a quick refresh coat
- Disappear minor knocks before returning a rented property
- Blend old filler marks without sanding half the room
If movement, damp or poor original plaster work are at play, one careful, more invasive repair is usually kinder to the wall than a decade of tiny patches. The knife will still have a role then – for the final smoothing and feathering over a properly fixed base.
FAQ:
- Does this work on every type of paint?
It works best on standard matt and soft-sheen emulsions. On very glossy or silk finishes, fine sanding and careful priming are crucial to avoid visible edges or changes in sheen.- Can I use a metal scraper instead of a flexible knife?
You can, but rigid scrapers are more likely to gouge fresh lines into the wall. A flexible filling knife or plastic spreader is designed to follow small curves and give a softer, feathered finish.- What if the dent is in new plaster?
Make sure the plaster is fully dry and sealed with a mist coat first. Then use the same technique with a fine filler. Avoid soaking new plaster with repeated wet wiping.- Do I always have to sand afterwards?
For very tiny repairs and ultra-smooth application, some decorators simply rub with a slightly rough cloth once the filler is dry. However, a quick pass with fine sandpaper gives a more reliable, flush finish.- Will this hide screw holes for heavy shelves or TVs?
It will hide the surface scars, but if the wall has been weakened or anchor points are loose, the structural issue needs addressing separately. The knife solves what you can see, not what you hang from it.


Comments (0)
No comments yet. Be the first to comment!
Leave a Comment