The wardrobe rail position that stylists use to instantly create more hanging space
You open the wardrobe, nudge aside a sleeve, and three hangers leap at you like they’ve been waiting all night. Shirts slide off in clumps, a dress hem tangles with a blazer, and somewhere in the crush is the one thing you actually wanted to wear. You push, squeeze, maybe even take half of it out just to put one hanger back in. It feels as if the rail is too short, your clothes are too many, and your storage is doomed. Then a stylist walks in, doesn’t buy a single new thing, and somehow makes space appear.
They haven’t discovered a new kind of hanger. They’ve changed the rail.
Why your current rail wastes more space than you think
Most fitted wardrobes come with the rail fixed dead-centre, front to back, and at a “standard” height that suits exactly no one in particular. It looks neat on a plan, but it’s a quiet saboteur. Clothes hang in the middle, with dead air in front and a useless gap behind. Long pieces trail on the floor, swallowing the chance for a second rail or a shelf. You’re storing more air than outfits.
Stylists see a wardrobe differently. They look at the full depth, the distance from rail to floor, the way your hangers actually sit when the doors are closed. They know the trick isn’t cramming; it’s shifting. Move the rail a few centimetres forward or higher and you unlock room for a second level, slimmer hangers, or shelves that suddenly fit without crushing hems. The numbers are small; the gain feels big.
Think of it as editing a room layout, but in miniature. Sofa to one wall, chair to the corner, and the space breathes. Rail slightly forward, slightly higher, and the hanging runs loosen. That’s where the “extra” space hides - not in more furniture, but in smarter lines.
The stylist’s rail move: up a bit, forward a bit
Here’s the core move professionals reach for when they want instant hanging space without building an entirely new wardrobe.
- Raise the rail so the bottom of your longest everyday pieces (blouses, shirts, blazers) hangs 10–15 cm above the floor or shelf.
- Shift the rail forward so hangers sit just behind the line of the doors, usually 5–8 cm from the front edge.
That small adjustment does three things at once. It frees enough vertical room under tops and blazers for a second rail or stackable storage. It pulls sleeves and shoulders away from the back wall so hangers stop snagging and overlapping at a diagonal. And it uses the full depth of the wardrobe, because the bulk of the garment now falls into the space behind the hanger, not in front of it where you can’t use it.
“Up a notch, forward a notch - that’s the whole secret,” says one London stylist. “You gain a second rail without buying a bigger wardrobe.”
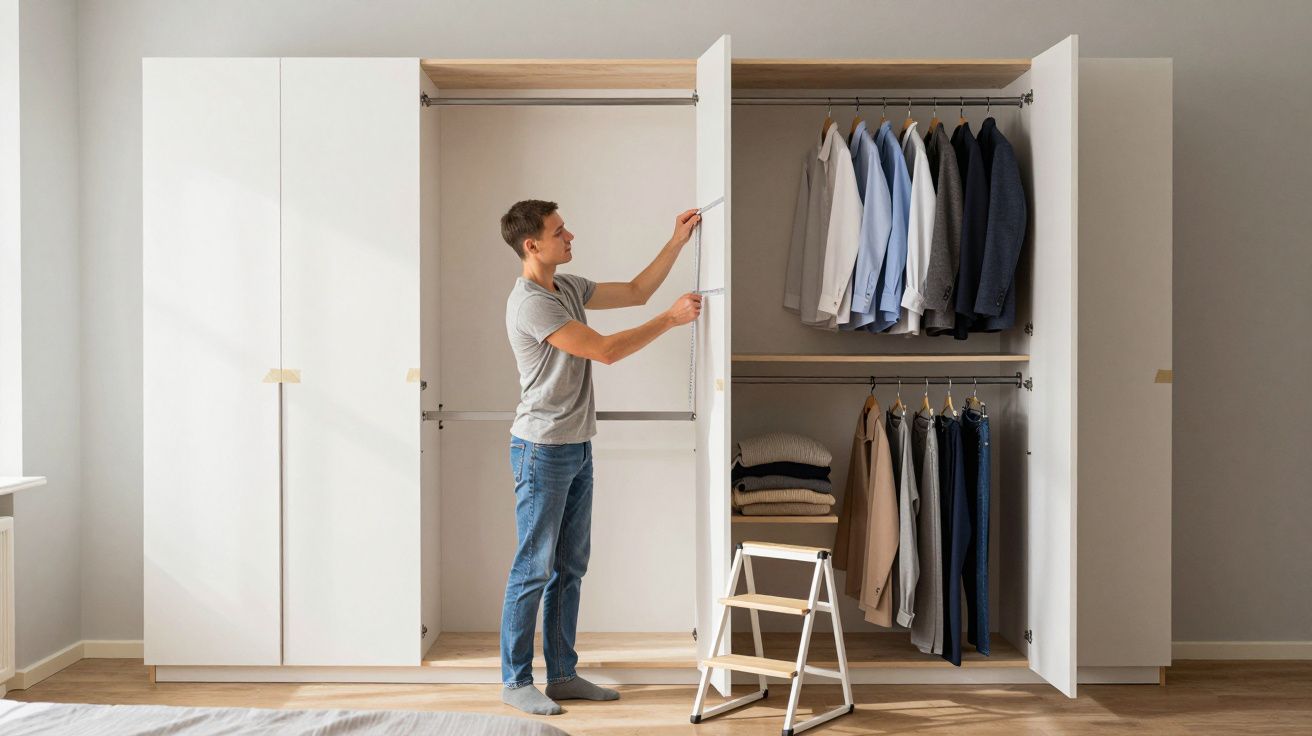
In a typical 220 cm-high wardrobe, nudging the main rail up to around 180–185 cm and forward by a few centimetres usually leaves enough space for a second rail at about 95–110 cm. Short jackets and shirts live up top; skirts, trousers folded on hangers and shorter dresses take the lower tier. The eye reads two calm lines instead of one chaotic crush.
How to reset your rail in an afternoon
Start simple. Empty one side of the wardrobe completely and measure three things: full internal height, depth from back panel to inside of doors, and the height of your longest pieces from hanger hook to hem. You’re hunting for where clothes actually end, not where the old screws say the rail must go.
Next, mark your new rail height with masking tape. Hang a couple of your longest tops or blazers on a rail or broom handle held at that level. Check that you still have 10–15 cm clearance to the floor or shelf. Now measure down for a potential second rail. If you can get at least 80–90 cm between rails, you’ve got a winner.
Common pitfalls are predictable. People place the rail too low “for easy reach”, then lose the chance for double hanging. Others keep it centred front-to-back, sacrificing precious depth. And some skip measuring altogether, only to discover their maxi dress sweeping along the bottom like a mop. A quick sketch and two minutes with a tape measure beat guesswork every time.
Small hardware tweaks help, too:
- Use adjustable rail supports so you can fine-tune height later.
- Swap bulky wooden hangers for slim velvet or good-quality plastic to claw back width.
- Keep a clear “finger-width” gap per hanger so clothes slide rather than jam.
Once you’ve found the sweet spot on one side, mirror it or adapt it on the other. Fold-heavy items like knitwear and jeans can claim shelves; hanging earns its place for anything that creases or needs visibility.
Make your rail work harder every day
A repositioned rail is the backbone. The habit is what keeps the space feeling generous instead of frantic.
Use your “prime rail” - usually eye level - for the pieces you reach for weekly: workwear, everyday dresses, outer layers in current season. The lower rail suits categories you loop through often but not daily: skirts, smarter trousers, evening tops. Anything you haven’t worn in a year? That belongs off the rail entirely, in a box, another room, or a charity bag.
Think in zones rather than colours if you dress by function: work, weekend, going out, at-home comfy. If outfit-building feels painful in the morning, hang a couple of “ready-made” looks together on the rail edge - shirt, trouser, belt, maybe a scarf on a hook. The new space you’ve created makes this feel possible instead of cramped.
| Rail tweak | What it does | Why it helps you |
|---|---|---|
| Raise and double up | Creates two levels of hanging | Almost doubles capacity for shorter items |
| Shift rail forward | Uses full depth, stops snagging | Clothes sit flatter and are easier to slide |
| Slimline hangers | Reduce shoulder bulk per piece | More garments without feeling overstuffed |
Finishing touches are quiet but powerful. A small rail-mounted hook holds tomorrow’s outfit. A hanging organiser at one end corrals belts and scarves that once swallowed hanger space. A quarterly “edit day” keeps only what earns its centimetres.
When you can’t move the rail (and how to cheat it)
Not every wardrobe lets you redrill holes or fit a new bar, especially in rented homes. You still have options.
Clip-on or tension rails can sit beneath the existing one, creating an instant second tier for lightweight pieces. Cascading hanger chains let you drop several items from a single hook, which is more organised than it sounds when you keep them by category. Shortening long items by folding them over a hanger arm clears the lower half for shallow boxes or shoe racks.
Over-door hooks on the inside of wardrobe doors give you a pseudo-front rail for next-day outfits, gym wear or regularly grabbed jackets. The principle stays the same: claim height, free the floor, move what you can towards the front where your hands actually are.
FAQ:
- Do I really need a second rail, or is it just clutter encouragement? If your current rail is packed so tight you can’t see what you own, a second rail usually increases visibility more than clutter. The key is editing before you install it, not after.
- What if I’m short and can’t reach a higher rail? Raise the rail only as far as you can comfortably reach the hooks, then put lesser-used or seasonal items up top. A simple step-stool can live beside the wardrobe for occasional access.
- Will moving the rail damage a fitted wardrobe? Filling old screw holes neatly and using proper supports usually keeps things tidy, but if you’re renting, always check with your landlord or managing agent first.
- Is it worth buying new hangers for this? Often yes. Slim, non-slip hangers can free up 20–30% capacity on their own and stop clothes sliding into a tangled mass.
- How often should I reset the layout? A light review at the start of each season is enough. Swap in current pieces to the prime rail, rotate out what you’re not wearing, and the space you created stays useful instead of slowly closing in again.


Comments (0)
No comments yet. Be the first to comment!
Leave a Comment