Why your reusable water bottle may be growing a hidden film – and the cap‑cleaning trick to stop it
It started with a faint slickness, the kind you only notice by accident. I twisted off the lid of my stainless steel bottle on the train and felt the threads drag like they’d been lightly oiled. The water tasted fine, but the cap looked dull, not quite clean, as if someone had breathed on it and walked away. I rinsed it under the tap, shrugged and carried on. A week later, there it was again: a cloudy ring under the silicone seal and a faint, sour smell when I opened it first thing.
The bottle itself gleamed inside. The culprit was hiding in plain sight – in the lid, the straw, the grooves I never properly reached. I’d been washing the bit I could see and ignoring the bit the water actually touched every day. Once I pulled the cap apart, the story changed. There, tucked under the seal, was a thin, translucent film clinging to the plastic like clingfilm that refused to let go. Biofilm, as it turns out, is very patient.
We’ve all had that moment when you realise the thing you carry “to be healthier” might be quietly growing its own ecosystem. That’s when you stop swilling and start dismantling.
What that cloudy film actually is
That faint slime is more than old water. It’s a biofilm – a community of bacteria, yeasts and microscopic hangers‑on that glue themselves to surfaces that stay damp. Think of it as plaque for bottles: it doesn’t leap out in lurid colours, but it builds layer by layer, especially where brushes and rinses don’t quite reach. The cap, the thread, the flip spout and the underside of silicone seals are prime real estate.
On its own, a bit of everyday bacteria isn’t a horror story. Most of what colonises a healthy person’s bottle is garden‑variety environmental flora and harmless mouth bacteria hitching a ride back from each sip. The trouble is that the biofilm acts like a sticky hotel. It traps nutrients from drinks, slows drying, and gives less friendly microbes a cosy place to settle if they arrive.
You’ll notice it in small ways first. A bottle that smells “off” after a single day. A cap that never feels truly clean, even straight from the wash. Water that tastes faintly stale even though it came from the same tap as the glass next to it. That’s your cue: the film is winning.
Why the cap is the sneakiest part
Most people do the obvious bit. They rinse the main body, maybe swirl some washing‑up liquid, give it a shake, and call it done. The cap and its hidden crevices get a perfunctory splash. That’s like brushing your teeth and ignoring the gum line. The design doesn’t help. Modern reusable bottles arrive with flip‑tops, straws, removable discs, metal hinges and neat silicone gaskets that are brilliant for preventing leaks and terrible for quick cleaning.
Biofilm loves the places your sponge doesn’t easily find. Under the silicone ring that makes the lid watertight. Inside the channel of a built‑in straw. Along the tiny air hole that stops the glug. Any spot that stays damp, dark and faintly warm between uses becomes a slow‑growing problem. Let’s be honest: nobody dismantles their bottle every night after a long day.
The good news is that you don’t need to. You just need a simple routine that actually reaches those hiding spots once or twice a week, and a lazy‑day hack for the evenings you can’t be bothered.
The cap‑cleaning trick that actually works
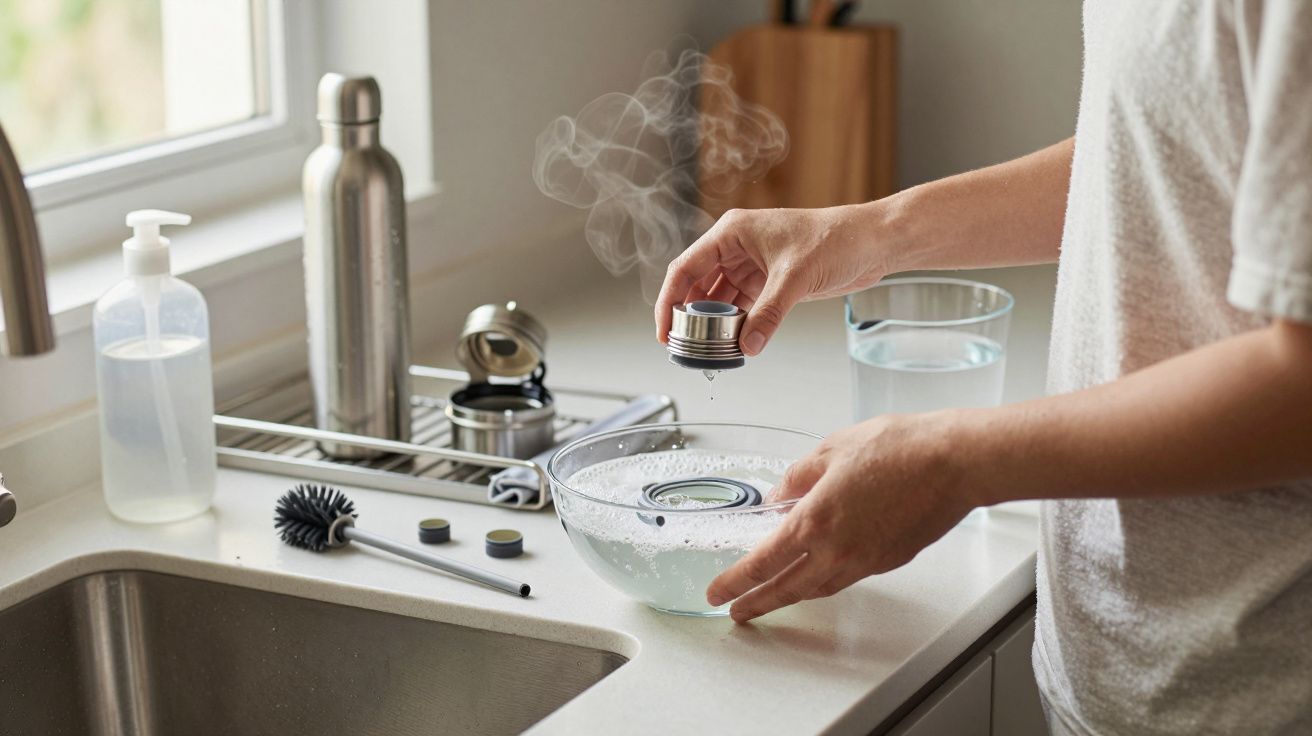
Here’s the method that finally got rid of that clingy film. It doesn’t require special tablets or a gadget that lives at the back of a cupboard. Just heat, a bit of kit, and ten deliberate minutes.
First, take the bottle apart more than you think you need to. Pop off the silicone seal, pull out the straw, remove any removable disc or spout insert. If you’re not sure they come apart, check the brand’s care page once; many pieces that look fixed will actually lift with a gentle nudge from a fingernail or blunt cutlery handle.
Then do this:
- Fill a bowl or jug with very hot (not boiling) water and a small squeeze of unscented washing‑up liquid.
- Add a splash of white vinegar or a teaspoon of bicarbonate of soda if the smell is stubborn, but avoid both together – they cancel each other out.
- Drop in the lid pieces, straw and seal. Let them soak for 10–15 minutes.
- Use a small brush – a straw brush, interdental brush, or an old soft toothbrush – to scrub the threads, vents and under the seal groove.
- Rinse everything thoroughly under running water and let it air‑dry completely before reassembling.
The soaking loosens the film; the brush breaks it up; the drying step stops it simply re‑settling as a damp layer. Do this full deep‑clean once a week if you use the bottle daily, and you’ll notice the “morning smell” quietly disappear.
“Treat the cap like cutlery, not furniture,” said a hygiene scientist I spoke to. “If it touches your mouth or your drink, it needs regular, proper washing.”
For busy weekdays, a stripped‑down rhythm still helps. Rinse the bottle and cap with hot water as soon as you’re home, leave the lid off overnight so everything can fully dry, and park the weekly deep‑clean on a set day – Sunday night, after the last cup of tea, works for me.
Everyday habits that keep the film from coming back
Once you’ve done the slightly fiddly first clear‑out, prevention makes the biggest difference. You don’t need to turn into a lab technician; you just need to stop giving the biofilm perfect conditions.
A few simple rules:
- Avoid topping up half‑finished water all day. Empty, rinse, then refill.
- Don’t leave the bottle in warm places – a steamy locker room, a hot car, next to a radiator.
- Stick to water most of the time. Sugary drinks, juice and protein shakes feed the film faster.
- Let the bottle dry completely at least once every 24 hours. Lid off, upside down on a rack is ideal.
- Rotate bottles if you have more than one, so each gets a proper dry period.
If you ever see visible mould – black, pink or fuzzy patches – or smell something sharp and musty that doesn’t shift after a deep clean, be ruthless. Some lids are cheap to replace and not worth the risk. A fresh cap costs less than a takeaway coffee and removes the question mark.
Here’s a quick reference you can glance at when you’re standing by the sink wondering if you really need to do more than a rinse:
| Habit | What to do | Why it helps |
|---|---|---|
| Daily rinse | Hot water, lid off to air‑dry | Breaks up early film before it settles |
| Weekly deep‑clean | Soak, brush, full dismantle | Strips hidden biofilm from caps and seals |
| Drink choices | Mostly water, rinse after flavoured drinks | Starves microbes of easy sugars |
What this changes in your day
Once the routine beds in, something subtle shifts. Your bottle stops being slightly suspect and goes back to being what you meant it to be: a simple way to drink more water without a side order of doubt. The first week after I scrubbed under the seal, the difference was weirdly obvious. No morning waft when I opened the lid. No slickness on the threads. Just cold water tasting like… nothing much at all, which is exactly what you want.
It also changes how many products you feel you need. You don’t have to stock special tablets for every bottle in the house. A small brush, a bowl of hot water and the occasional splash of vinegar do the heavy lifting. The fewer extra things you juggle, the more likely you are to actually wash the bottle properly rather than telling yourself you’ll do it “when you have time”.
You may even find yourself eyeing up the family sports bottles and lunch flasks one Sunday, wondering what’s lurking under those lids. The method is the same. Take them apart, soak, scrub, dry, reassemble. Clean isn’t complicated. It’s just about reaching the bits you used to ignore.
FAQ:
- How often should I deep‑clean my reusable bottle and cap? If you use it daily, aim for a full dismantle and scrub once a week, with hot‑water rinses and overnight drying in between. If you regularly carry sweet drinks or leave it in warm places, twice a week is wiser.
- Is vinegar enough to disinfect my bottle? Vinegar helps loosen mineral deposits and some biofilm, but it’s not a hospital‑grade disinfectant. For normal home use, hot water, washing‑up liquid, a brush and thorough drying are usually sufficient. Follow your bottle maker’s guidance if you’re immunocompromised.
- Can I put my bottle and lid in the dishwasher? Many stainless steel and hard plastic bottles are labelled dishwasher‑safe for the body and sometimes the cap. Check the base or the instructions. Even if they are, small crevices and under‑seal areas still benefit from the occasional manual brush clean.
- What’s the safest material for avoiding biofilm? Stainless steel and glass are less porous and easier to clean than some plastics, but any material will grow biofilm if it stays damp and dirty. Design matters more: simple shapes, removable seals and straight channels are easier to keep clean.
- When should I replace a bottle or lid altogether? If cracks appear, seals stay stained or mouldy despite cleaning, or the plastic has gone rough or cloudy inside, it’s time to replace. Damaged surfaces harbour more microbes and are harder to disinfect properly.


Comments (0)
No comments yet. Be the first to comment!
Leave a Comment